
more IBM historical archives ...
Since any piece of hardware needs a specialized piece of code in the kernel to work the hardware, the so called driver, a full kernel can be quite large, including code for all the possible hardwares that exist. In order to make the kernel size manageable, many kernel components are modules, pieces of code that are dynamically combined into the kernel on an on-need basis. All operating systems have these as well. OSX calles the kernel extensions, or "kext". In linux they are also called kernel objects and have extensions "ko".
Although the size of the running kernel is greatly reduced by use of kernel objects, the code still has to be compiled. One thing I will talk about is the configuration of a kernel, which also includes instructing the build which drivers to omit in the build. If one builds all drivers, the build will go upwards of a good portion of a day.
Linux is arranged in "distros", distributions, and is otherwise a combination of the linux kernel, GNU software, and distro specific code to administrate the system and its installation. There is also third party code that might be outside the distro system, or poorly integrated into the distro system. Whatever distro of Linux used, they all agree on the kernel, as it is the possession of Linus Torvalds. After we install the kernel sources, we configure the kernel, indicating a minimal number of drivers and also all the build options of code inside the kernel proper.
The entire process is as follows:
Find the terminal application (using search) and open a terminal window. You are running as a user, and will need root privileges. Ubuntu and other unix's provide the sudo program to elevate privilege. You can either use sudo for a single command, as in "sudo _command_", or start a shell which root privileges by sudo'ing /bin/bash.
First, update your install. "Apt-get" allows you to update installed programs, and install new programs. It downloads updates and programs from repositories, so do make sure the local indices of these repositories is up-to-day by running apt-get update. Then upgrade all installed software with apt-get upgrade. Then, just to make sure all the new software is currently running, reboot.
   sudo /bin/bash
   apt-get update
   apt-get upgrade
   reboot
Install subversion and get your subversion repository on cloned to your home directory:
   sudo apt-get install subversion
   svn co --username=_username_ svn://svn.cs.miami.edu/classes/csc421.151 csc421.repo
You will need to enter your password. Your username is the four letter username given to you for this class. Actually, all uses of subversion in the department will use this username. For the lab accounts, add the class number to the end of this four letter username. For subversion, do not add the class number.
Next, download the kernel sources and prepared for the kernel build. You will need build tools. Install these packages (using sudo in front of apt-get, or the sudo /bin/bash trick to be root until you type "exit" at the command line):
   apt-get install kernel-package ncurses-dev bzip2
   cd /usr/src
   apt-get install linux-source
   cd linux-source-3.13.0
   tar jxf linux-source-3.13.0.tar.bz2
You now have the kernel sources that match your running installed kernel. Use "uname -a" to see what kernel that is. It should be 3.13 something.
Before building a kernel, you need to configure the build. This states the options that the kernel will include, will choose whether certain functionality is built-in or placed in a separable module; and what functionality and drivers will be omitted from the build altogether. A full build takes hours.
A suitable
dot-config file has been placed in class subversion repo,
under the class/kernel folder.
Once a full build is done, future builds are much shorter, rebuilding only what has changed, or what depends upon things that changed.
The config files for a linux build is a hidden file with name ".config"
which is placed in the root of the build tree. You unpacked your
source into the directory /usr/src/linux-source-xyz,
so the full pathname of the config file is
/usr/src/linux-source-xyz/.config.
You can't just place the file the there — you have to run make oldconfig to
integrate it into the overall configuration options that are discovered by looking at
Kconfig files throughout the build tree.
To build the kerneL:
cd /usr/src/linux-source-3.13.0/linux-source-3.13.0. This will bring
you to the root of the build tree. All sources and built objects are under this folder.
make oldconfig. Copy the configuration file from class/kernel/dot-config to ".config" in the
root of the build tree.
make. This will build all binaries and modules. Expect it to take two
hours or more the a full build. Afterwards build times will depend on what has
been modified
make modules_install. This will move the modules into a subdirectory of /lib/modules.
Check that the subdirectory has the name of the revision, it might say 3.16.11.6; there will
already be a 3.13.0-32-generic subdirectory. That is your generic "safe" set of modules,
placed there on install.
make install. This moves the kernel and other files to /boot, it
creates a very important file in /boot called initrd.img-_kernel-revision_, and will
update the grub boot loader configuration file.
/lib/modules/[kernel revision name].
/boot/vmlinuz-[kernel revision name],
/boot/config-[kernel revision name],
System.map-[kernel revision name],
The initial build takes two hours. However, future builds can be much faster, depending on the the consequences of what you edit. The makefiles determine the minimum number of files that need to be recompiled and re-linked. If you do a make clean you can do the rebuild from zero, as make clean will remove all the object files.
Here is a terminal script from an older capture of the build. Newer builds may differ a bit.
 To manipulate the .config file, you can
use:
To manipulate the .config file, you can
use:
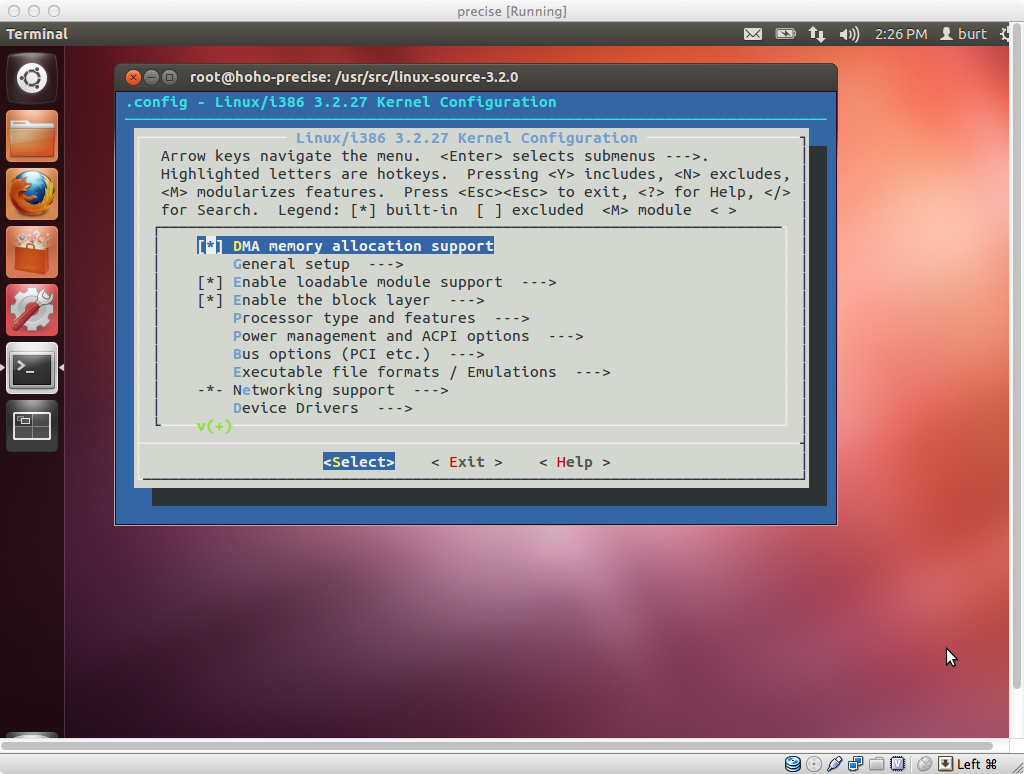
make menuconfigThis is a graphical view that works using the "curses" library, so that it works even without a graphical desktop. You will need ncurses-dev installed for this to work.
Run make help in the root of the build source for information
on the build targets. Modules are each a separate file, with a
.ko extension. They are installed by being copied into the special
directory /lib/modules/[kernel revision name].
Kernel modules are parts of the kernel that are dynamically loaded as
needed.
Linux uses a very intelligent buffer cache to shuttle data blocks to and from the disk. Each buffer in the buffer cache remembers what disk block it mirrors. A read to a disk to can satisfied without going out to the disk if the block has recently been read or written, if the buffer that held that block is still in the cache.
With such a sophisticated buffer cache, it was discovered that a RAM disk can be created more efficiently by stopping the transfer at the buffer cache, and marking the buffer in the cache which carries data to the RAM disk as "permanent". No need to copy an in-RAM buffer in the buffer cache to an in-RAM buffer in the RAM disk. Just sitting permanently in the buffer cache is sufficient to create an in-RAM file system.
This scheme was christened the ramfs.
After building and installing the kernel and the modules, you need to build the initial root directory. In case you google for additional help on this, beware that the initial root directory process has changed recently. It now uses a simple cpio into a ramfs, rather than imaging a RAM-disk.
At boot, the boot loader knows only enough about reading from disk so that it can copy the kernel from a file on disk into the memory, and then begin running the kernel (early boot). The kernel itself might rely on modules to provide the code necessary to access the file systems on disk. These modules are files that might reside on the file systems which the kernel cannot yet read.
Linux solves this problem by having a partition on disk in a file format
that the boot loader and the initial kernel know how to read.
Generally this is ext2, and the partition is later remounted into the
runtime file tree at /boot.
The kernel is stored in this partition, as well as an archive of
the initial file system required by the kernel during early boot.
The kernel creates a ramfs and unpacks this archive into the
ramfs and mounts this as the initial root directory.
This root serves the kernel during early boot, but is later jettisoned when the real root directory is discovered on disk and mounted over the initial root, called re-rooting or pivoting on root.
The process of creating a initial root directory is automated by the
update-initramfs script. It creates a file called
initrd.img-[kernel revision name] in the /boot
directory.
You need to run this program or your kernel won't complete boot.
If you watch your boot output carefully,
you will see that the boot process seemed to go well up until the
first file access to the file system.
The error messages will be about not finding a root file system,
or not recognizing it. That means the initrd was not properly formed
or placed.
A single linux install can boot to any of several kernels. You will not be overwriting the old kernel with the new kernel. You will be providing an option at boot to run either the old kernel or the new kernel. Since the modules are in directories with names that correspond to the kernel names, the option will be to run the new kernel and all the new modules or the old kernel and all the old modules.
Kernel names differ because of the various revision numbers, or because you added a local suffix to the name, such as "-burt". (Note hyphen as first character.) You can specify a local suffix as an option in the .config file, using menuconfig.
The boot loader boots the system. There are three boot loaders you might see: lilo, grub and grub2. The Ubuntu we are using installs grub2. Before rebooting, you have to inform grub2 of your new kernel, so it can put in in the boot menu. You also have to modify its behavior a slight bit. By default, grub2 does a quiet boot, and it does not show the boot menu. (Booting with the shift key depressed will show the boot menu, and I think it cancels quiet boot.)
Edit /etc/default/grub as follows:
    #GRUB_HIDDEN_TIMEOUT=0 # comment out this line
    GRUB_CMDLINE_LINUX_DEFAULT="" # set this to the empty string
Then run update-grub. This will include your kernel
in the boot menu, and create a new boot that is verbose and which
shows the boot menu.
Now you are ready to try your new kernel. Type reboot
and your machine will reboot. At the boot menu, select your kernel.
Hopefully it will boot properly. Once booted,
use uname -r to see the revision number of the kernel
you are running. If it is yours, congratulations!
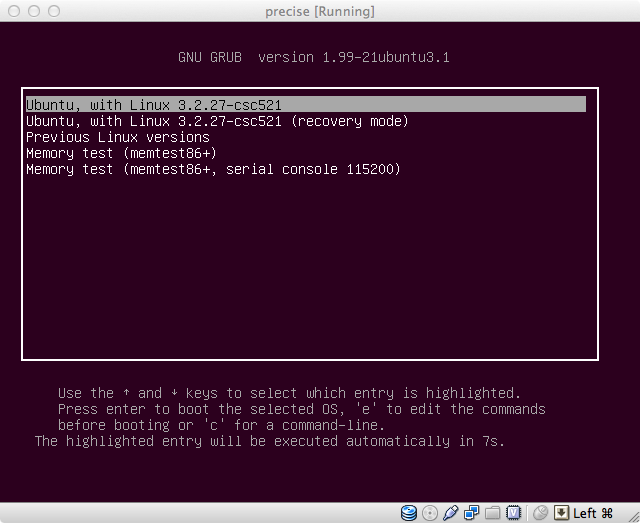
Changes in Grub2 make it likely that your kernel can be selected by going to a submenu, labeled "Previous Linux versions" in this image. For people going back and forth between kernels, this is unfortunate. It is difficult to convince Ubuntu to place all (or even a few more) kernels on the main boot menu.

Author: Burton Rosenberg
Created: September 5, 2010
Last Update: 13 Sept 2014