more IBM historical archives ...
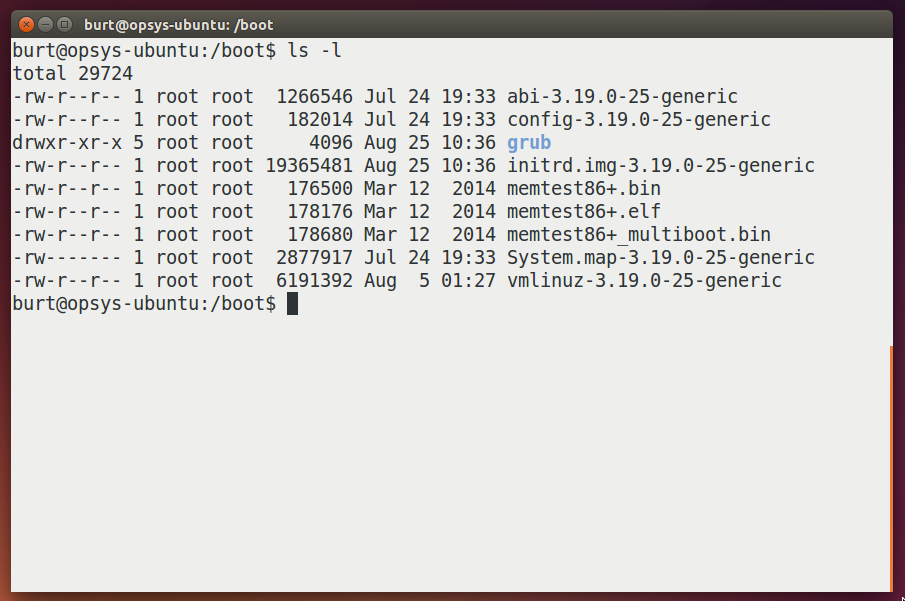
The vmlinuz and initrd files are in a /boot directory. This directory is special — it is reserved for boot files, and the bootloader knows to look for this directory. It is generally a separate partition of the primary disk where the operating system is installed.
The full names of the vmlinuz and initrd files includes the kernel version number and an optional final tag. This string must match between vmlinuz and initrd, and is also used as the name of a subdirectory of /lib/modules. This subdirectory is the root of the directory tree where the kernel objects are stored.
We show here a listing of the /boot directory. The version number is 3.19.0-25 and the label is "generic".
The boot directory can have multiple kernels. The bootloader grub is configured by a script to search through /boot and to prepare a boot screen listing all the kernels it sees in /boot. If the kernel you hack for the course projects crashes, or fails to boot, you can always select to boot the original kernel.
Rather than compile all the code that is every possibly needed into vmlinuz, Linux has a system of modules, which is code that can be drawn into the kernel dynamically, as needed, after boot. Modules are code files with .ko extensions.
For instance, a special driver for a USB device might require kernel code, but Linux cannot possible deliver all such special drivers to all installs. Instead, there is a system of device probing that will dynamically match up a USB device with the drivers it requires, and the module containing the driver will be drawn into the kernel on-demand.
Because there are drivers for almost every piece of hardware, and there is such a variety of hardware, there are a lot of modules. To compile all modules can take days. We will adjust the kernel configuration file to direct the build to the minimum of modules.
Besides, make employs strategies to minimize the rebuild, by recognizing that if a .o file exists, and it is younger than its .c files, it does not need to build the .o file — the existing .o file is current. This way all modules, and much of the kernel, is only built once (unless you clean your source tree, to force a complete rebuild).
   sudo -s
   apt-get update
   apt-get upgrade
   reboot
   sudo -s
   apt-get install build-essential ncurses-dev libssl-dev
   apt-get install linux-source
   apt-get --no-install-recommends install kernel-package
   cd /usr/src/linux-source-4.4.0
   tar jvxf linux-source-4.4.0.tar.bz2
   cd /usr/src/linux-source-4.4.0/linux-source-4.4.0
   make defconfig
   make
   make modules_install
   make install
Before building a kernel, you need to configure the build. This states the options that the kernel will include, will choose whether certain functionality is built-in or placed in a separable module; and what functionality and drivers will be omitted from the build altogether.
The config files for a linux build is a hidden file with name ".config"
which is placed in the root of the build tree. You unpacked your
source into the directory /usr/src/linux-source-xyz,
so the full pathname of the config file is
/usr/src/linux-source-xyz/.config.
You can't just place the file the there — you have to run make oldconfig to
integrate it into the overall configuration options that are discovered by looking at
Kconfig files throughout the build tree.
The make target "defconfig" creates a .config file based on the current platform. It builds only what is necessary to support a system like the current platform. I have put a copy of the .config created by defconfig in repository in class/kernel/defconfing-4.4.0-.out. To modify this configuration, use "make menuconfig" — see the discussion below.
Make install does several things:
/lib/modules/[kernel revision name].
/boot/vmlinuz-[kernel revision name],
/boot/config-[kernel revision name],
System.map-[kernel revision name],
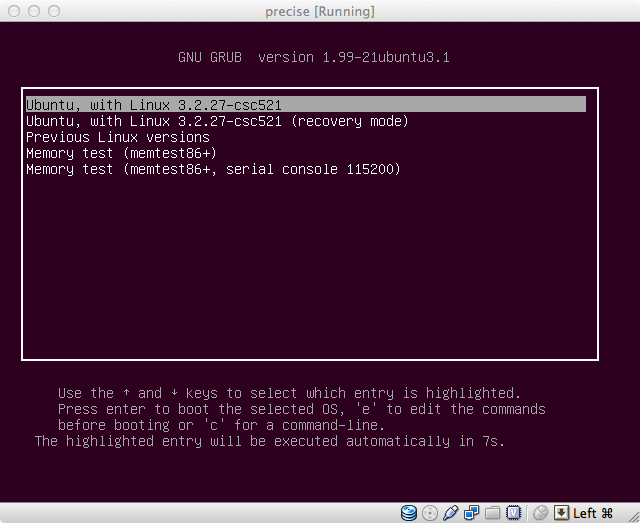
Changes in Grub2 make it likely that your kernel can be selected by going to a submenu, labeled "Previous Linux versions" in this image. For people going back and forth between kernels, this is unfortunate. It is difficult to convince Ubuntu to place all (or even a few more) kernels on the main boot menu.
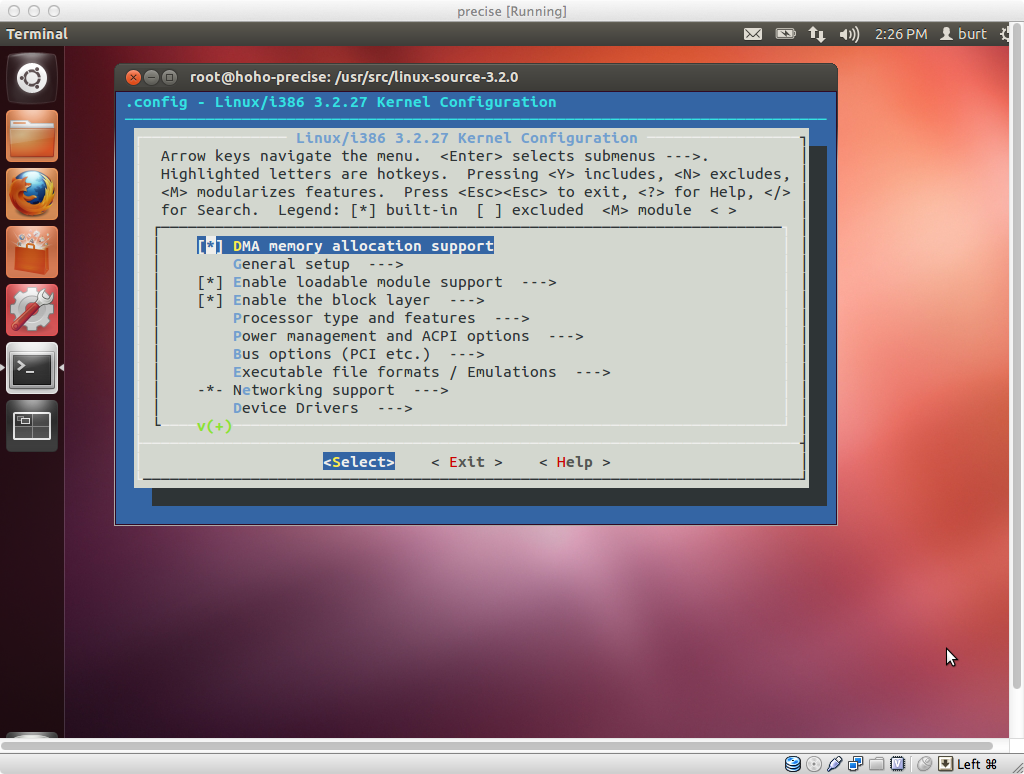
make menuconfigThis is a graphical view that works using the "curses" library, so that it works even without a graphical desktop. You will need ncurses-dev installed for this to work.
Run make help in the root of the build source for information
on the build targets. Modules are each a separate file, with a
.ko extension. They are installed by being copied into the special
directory /lib/modules/[kernel revision name].
Kernel modules are parts of the kernel that are dynamically loaded as
needed.
Linux uses a very intelligent buffer cache to shuttle data blocks to and from the disk. Each buffer in the buffer cache remembers what disk block it mirrors. A disk read can satisfied without going out to the disk if the block is sitting in the buffer cache, because the block has been recently read or written.
Given that the buffer cache exists, it was realized that a RAM disk can be created more efficiently by stopping the transfer between file system and disk at the buffer cache, and marking the buffer in the cache which carries data as "permanent". No need to copy an in-RAM buffer in the buffer cache to an in-RAM buffer in the RAM disk. Just sitting permanently in the buffer cache is sufficient to create an in-RAM file system.
This scheme was christened the ramfs.
After building and installing the kernel and the modules, you need to build the initial root directory. In case you google for additional help on this, beware that the initial root directory process has changed recently. It now uses a simple cpio into a ramfs, rather than imaging a RAM-disk. (See sidebar for discussion of Ramfs versus RAM-disk.)
At boot, the boot loader knows only enough about reading from disk so that it can copy the kernel from a file on disk into the memory, and then begin running the kernel (early boot). The kernel itself might rely on modules to provide the code necessary to access the file systems on disk. These modules are files that might reside on the file systems which the kernel cannot yet read.
Linux solves this problem by having a partition on disk in a file format
that the boot loader and the initial kernel know how to read.
Generally this is ext2, and the partition is later remounted into the
runtime file tree at /boot.
The kernel is stored in this partition, as well as an archive of
the initial file system required by the kernel during early boot.
The kernel creates a ramfs and unpacks this archive into the
ramfs and mounts this as the initial root directory.
This root serves the kernel during early boot, but is later jettisoned when the real root directory is discovered on disk and mounted over the initial root, called re-rooting or pivoting on root.
The process of creating a initial root directory is automated by the
update-initramfs script. It creates a file called
initrd.img-[kernel revision name] in the /boot
directory.
You need to run this program or your kernel won't complete boot.
If you watch your boot output carefully,
you will see that the boot process seemed to go well up until the
first file access to the file system.
The error messages will be about not finding a root file system,
or not recognizing it. That means the initrd was not properly formed
or placed.
A single linux install can boot to any of several kernels. You will not be overwriting the old kernel with the new kernel. You will be providing an option at boot to run either the old kernel or the new kernel. Since the modules are in directories with names that correspond to the kernel names, the option will be to run the new kernel and all the new modules or the old kernel and all the old modules.
Kernel names differ because of the various revision numbers, or because you added a local suffix to the name, such as "-burt". (Note hyphen as first character.) You can specify a local suffix as an option in the .config file, using menuconfig.
The boot loader boots the system. Historically, there have been three boot loaders: lilo, grub and grub2. Most Linux distros are using grub2. Before rebooting, you have to inform grub2 of your new kernel, so it can put in in the boot menu. You also have to modify its behavior a slight bit. By default, grub2 does a quiet boot, and it does not show the boot menu. (Booting with the shift key depressed will show the boot menu, and I think it cancels quiet boot.)
Edit /etc/default/grub as follows:
    #GRUB_HIDDEN_TIMEOUT=0 # comment out this line
    GRUB_CMDLINE_LINUX_DEFAULT="" # set this to the empty string
Then run update-grub. This will include your kernel
in the boot menu, and create a new boot that is verbose and which
shows the boot menu.
Now you are ready to try your new kernel. Type reboot
and your machine will reboot. At the boot menu, select your kernel.
Hopefully it will boot properly. Once booted,
use uname -r to see the revision number of the kernel
you are running. If it is yours, congratulations!

Author: Burton Rosenberg
Created: September 5, 2010
Last Update: 11 Sept 2016